NPM Workspaces Tutorial
In this tutorial, you'll learn how to add Nx to a repository with an existing NPM workspaces setup.
What will you learn?
- how to add Nx to the repository with a single command
- how to configure caching for your tasks
- how to configure a task pipeline
- how to configure projects automatically with Nx Plugins
- how to manage your releases with
nx release - how to speed up CI with Nx Cloud ⚡
Starting Repository
To get started, fork the sample repository and clone it on your local machine:
❯
git clone https://github.com/<your-username>/tuskydesign.git
The repository has three TypeScript packages under packages/animals, packages/names and packages/zoo. The zoo package uses animals and names to generate a random message. The root package.json has a workspaces property that tells NPM how to find the projects in the repository.
1{
2  "workspaces": ["packages/*"]
3}
4
Because of this setting, when the install command is run at the root, the correct packages are installed for each project. NPM will create dedicated node_modules folders inside of each project folder where necessary.
❯
npm install
Now let's try running some tasks. To build the animals package, use the build npm script:
~/tuskydesigns❯
npm run build -w @tuskdesign/animals
1> @tuskdesign/animals@1.2.0 build
2> tsc --build tsconfig.lib.json
3
The repository is set up using TypeScript project references so building the zoo package will automatically build all its dependencies.
~/tuskydesigns❯
npm run build -w @tuskdesign/zoo
1> @tuskdesign/zoo@1.2.0 build
2> tsc --build tsconfig.lib.json
3
To run the zoo package use the serve script:
~/tuskydesigns❯
npm run serve -w @tuskdesign/zoo
1> @tuskdesign/zoo@1.2.0 serve
2> node dist/index.js
3
4Bo the pig says oink!
5
Now that you have a basic understanding of the repository we're working with, let's see how Nx can help us.
Smart Monorepo
Nx offers many features, but at its core, it is a task runner. Out of the box, it can cache your tasks and ensure those tasks are run in the correct order. After the initial set up, you can incrementally add on other features that would be helpful in your organization.
Add Nx
To enable Nx in your repository, run a single command:
~/tuskydesigns❯
npx nx@latest init
This command will download the latest version of Nx and help set up your repository to take advantage of it.
First, the script will propose installing some plugins based on the packages that are being used in your repository.
- Deselect both proposed plugins so that we can explore what Nx provides without any plugins.
Second, the script asks a series of questions to help set up caching for you.
Which scripts need to be run in order?- ChoosebuildWhich scripts are cacheable?- ChoosebuildandtypecheckDoes the "build" script create any outputs?- EnterdistDoes the "typecheck" script create any outputs?- Enter nothingWould you like remote caching to make your build faster?- ChooseSkip for now
Explore Your Workspace
If you run nx graph as instructed, you'll see the dependencies between your projects.
~/tuskydesigns❯
npx nx graph --focus=@tuskdesign/zoo
Nx uses this graph to determine the order tasks are run and enforce module boundaries. You can also leverage this graph to gain an accurate understanding of the architecture of your codebase. Part of what makes this graph invaluable is that it is derived directly from your codebase, so it will never become out of date.
Caching Pre-configured
Nx has been configured to run your build, typecheck and lint tasks. You can run a single task like this:
~/tuskydesigns❯
npx nx build @tuskdesign/zoo
Or all tasks with a certain name like this:
~/tuskydesigns❯
npx nx run-many -t typecheck
During the init script, Nx also configured caching for these tasks. You can see in the nx.json file that the build, typecheck and lint targets have the cache property set to true and the build target specifies that its output goes to the project's dist folder.
1{
2  "$schema": "./node_modules/nx/schemas/nx-schema.json",
3  "targetDefaults": {
4    "build": {
5      "dependsOn": ["^build"],
6      "outputs": ["{projectRoot}/dist"],
7      "cache": true
8    },
9    "typecheck": {
10      "cache": true
11    },
12    "lint": {
13      "cache": true
14    }
15  },
16  "defaultBase": "main"
17}
18
Try running build for the zoo app a second time:
~/tuskydesigns❯
npx nx build @tuskdesign/zoo
The first time nx build was run, it took about 1 second - just like running npm run build. But the second time you run nx build, it completes instantly and displays this message:
1Nx read the output from the cache instead of running the command for 3 out of 3 tasks.
2
You can see the same caching behavior working when you run npx nx typecheck.
Use Task Pipelines
You may be wondering why the caching message in the previous section mentioned 3 tasks when you only ran the build task from the terminal. When we said that build tasks must be run in order during the setup script, Nx created a simple task pipeline. You can see the configuration for it in the nx.json file:
1{
2  "targetDefaults": {
3    "build": {
4      "dependsOn": ["^build"]
5    }
6  }
7}
8
This configuration means that if you run build on any project, Nx will first run build for the dependencies of that project and then run build on the project itself. The ^build text means "the build tasks of the project's dependencies." You can visualize this in the Nx graph by selecting the Tasks dropdown in the top left and clicking Show all tasks:
~/tuskydesigns❯
npx nx graph
Alternatively, you can pass the --graph option to the run command to inspect the task graph.
~/tuskydesigns❯
npx nx run @tuskdesign/zoo:build --graph
Create a Task Pipeline
You may have noticed in the packages/zoo/package.json file, there is a serve script that expects the build task to already have created the dist folder. Let's set up a task pipeline that will guarantee that the project's build task has been run.
1{
2  "$schema": "./node_modules/nx/schemas/nx-schema.json",
3  "targetDefaults": {
4    "serve": {
5      "dependsOn": ["build"]
6    },
7    "build": {
8      "dependsOn": ["^build"],
9      "outputs": ["{projectRoot}/dist"],
10      "cache": true
11    },
12    "typecheck": {
13      "cache": true
14    }
15  },
16  "defaultBase": "main"
17}
18
The serve target's dependsOn line makes Nx run the build task for the current project before running the current project's build task. Now nx serve will run the build task before running the serve task.
Use Nx Plugins to Enhance Your Workspace
We mentioned earlier that this repository is using TypeScript project references defined in the tsconfig.json files to incrementally build each project so that the output is available for other projects in the repository. In order for this feature to work, the references section in the tsconfig.json files for each project need to accurately reflect the actual dependencies of that project. This can be difficult to maintain, but Nx already knows the dependencies of every project and you can use the @nx/js plugin to automatically keep the TypeScript project references in sync with the code base.
Nx plugins can:
- automatically configure caching for you, including inputs and outputs based on the underlying tooling configuration
- infer tasks that can be run on a project because of the tooling present
- keep tooling configuration in sync with the structure of your codebase
- provide code generators to help scaffold out projects
- automatically keep the tooling versions and configuration files up to date
For this tutorial, we'll focus on inferring tasks and keeping tooling configuration in sync.
First, let's remove the existing build and typecheck scripts from each project's package.json files to allow the @nx/js plugin to infer those tasks for us.
1{
2  "scripts": {}
3}
41{
2 "scripts": {}
3}
41{
2 "scripts": {
3 "serve": "node dist/index.js"
4 }
5}
6Now let's add the @nx/js plugin:
~/tuskydesign❯
npx nx add @nx/js
1✔ Installing @nx/js...
2✔ Initializing @nx/js...
3 NX  Generating @nx/js:init
4
5UPDATE nx.json
6UPDATE package.json
7
8 NX   Package @nx/js added successfully.
9
The nx add command installs the version of the plugin that matches your repo's Nx version and runs that plugin's initialization script. For @nx/js, the initialization script registers the plugin in the plugins array of nx.json. The registered plugin automatically infers build and typecheck tasks for any project with a tsconfig.json file. Open the project details view for the zoo package and look at the build task.
~/tuskydesigns❯
npx nx show project @tuskdesign/zoo
Notice that the inputs that are inferred for the build task match the include and exclude settings in the tsconfig.lib.json file. As those settings are changed, the cache inputs will automatically update to the correct values.
The build task also has a sync generator defined. The @nx/js:typescript-sync generator will automatically update the references property in the tsconfig.json files across the repository to match the actual dependencies in your code.
Let's see this behavior in action by extracting some common code into a new util library.
First, create a library with @nx/js:lib generator:
❯
nx g @nx/js:lib packages/util
Set the bundler to tsc, the linter to none and the unit test runner to none.
Now we can move the getRandomItem function from packages/names/names.ts and packages/animals/animals.ts into the packages/util/src/lib/util.ts file.
1export function getRandomItem<T>(arr: T[]): T {
2  return arr[Math.floor(Math.random() * arr.length)];
3}
41import { getRandomItem } from '@tuskdesign/util';
2
3// ...
41import { getRandomItem } from '@tuskdesign/util';
2
3// ...
4Now if you run run the build, Nx will notice that the TypeScript project references need to be updated and ask your permission to update them.
~/tuskydesigns❯
nx build @tuskdesign/zoo
1 NX   The workspace is out of sync
2
3The @nx/js:typescript-sync sync generator identified 6 files in the workspace that are out of sync:
4Based on the workspace project graph, some TypeScript configuration files are missing project references to the projects they depend on or contain outdated project references.
5
6Please note that having the workspace out of sync will result in an error in CI.
7
8? Would you like to sync the identified changes to get your workspace up to date? …
9❯ Yes, sync the changes and run the tasks
10  No, run the tasks without syncing the changes
11
Allow the sync to happen and you'll see that the tsconfig.json and tsconfig.lib.json files have been updated to include references to the new util library. With this system in place, no matter how your codebase changes, the TypeScript project references will always be correct.
Checkpoint
At this point, the repository is still using all the same tools to run tasks, but now Nx runs those tasks in a smarter way. The tasks are efficiently cached so that there is no repeated work and the cache configuration settings are automatically synced with your tooling configuration files by Nx plugins. Also, any task dependencies are automatically executed whenever needed because we configured task pipelines for the projects.
Open up the task graph for zoo app's serve task again to see the changes.
~/tuskydesigns❯
npx nx run @tuskdesign/zoo:serve --graph
Manage Releases
If you decide to publish the animals or names packages on NPM, Nx can also help you manage the release process. Release management involves updating the version of your package, populating a changelog, and publishing the new version to the NPM registry.
First you'll need to define which projects Nx should manage releases for by setting the release.projects property in nx.json:
1{
2  "release": {
3    "projects": ["packages/*"]
4  }
5}
6
Now you're ready to use the nx release command to publish the animals and names packages. The first time you run nx release, you need to add the --first-release flag so that Nx doesn't try to find the previous version to compare against. It's also recommended to use the --dry-run flag until you're sure about the results of the nx release command, then you can run it a final time without the --dry-run flag.
To preview your first release, run:
❯
npx nx release --first-release --dry-run
The command will ask you a series of questions and then show you what the results would be. Once you are happy with the results, run it again without the --dry-run flag:
❯
npx nx release --first-release
After this first release, you can remove the --first-release flag and just run nx release --dry-run. There is also a dedicated feature page that goes into more detail about how to use the nx release command.
Fast CI ⚡
Make sure you have completed the previous sections of this tutorial before starting this one. If you want a clean starting point, you can fork the sample repository with Nx already added.
So far in this tutorial you've seen how Nx improves the local development experience, but the biggest difference Nx makes is in CI. As repositories get bigger, making sure that the CI is fast, reliable and maintainable can get very challenging. Nx provides a solution.
- Nx reduces wasted time in CI with the
affectedcommand. - Nx Replay's remote caching will reuse task artifacts from different CI executions making sure you will never run the same computation twice.
- Nx Agents efficiently distribute tasks across machines ensuring constant CI time regardless of the repository size. The right number of machines is allocated for each PR to ensure good performance without wasting compute.
- Nx Atomizer automatically splits large e2e tests to distribute them across machines. Nx can also automatically identify and rerun flaky e2e tests.
Connect to Nx Cloud
Nx Cloud is a companion app for your CI system that provides remote caching, task distribution, e2e tests deflaking, better DX and more.
Now that we're working on the CI pipeline, it is important for your changes to be pushed to a GitHub repository.
- Commit your existing changes with
git add . && git commit -am "updates" - Push your changes to your forked GitHub repository with
git push
Now connect your repository to Nx Cloud with the following command:
❯
npx nx connect
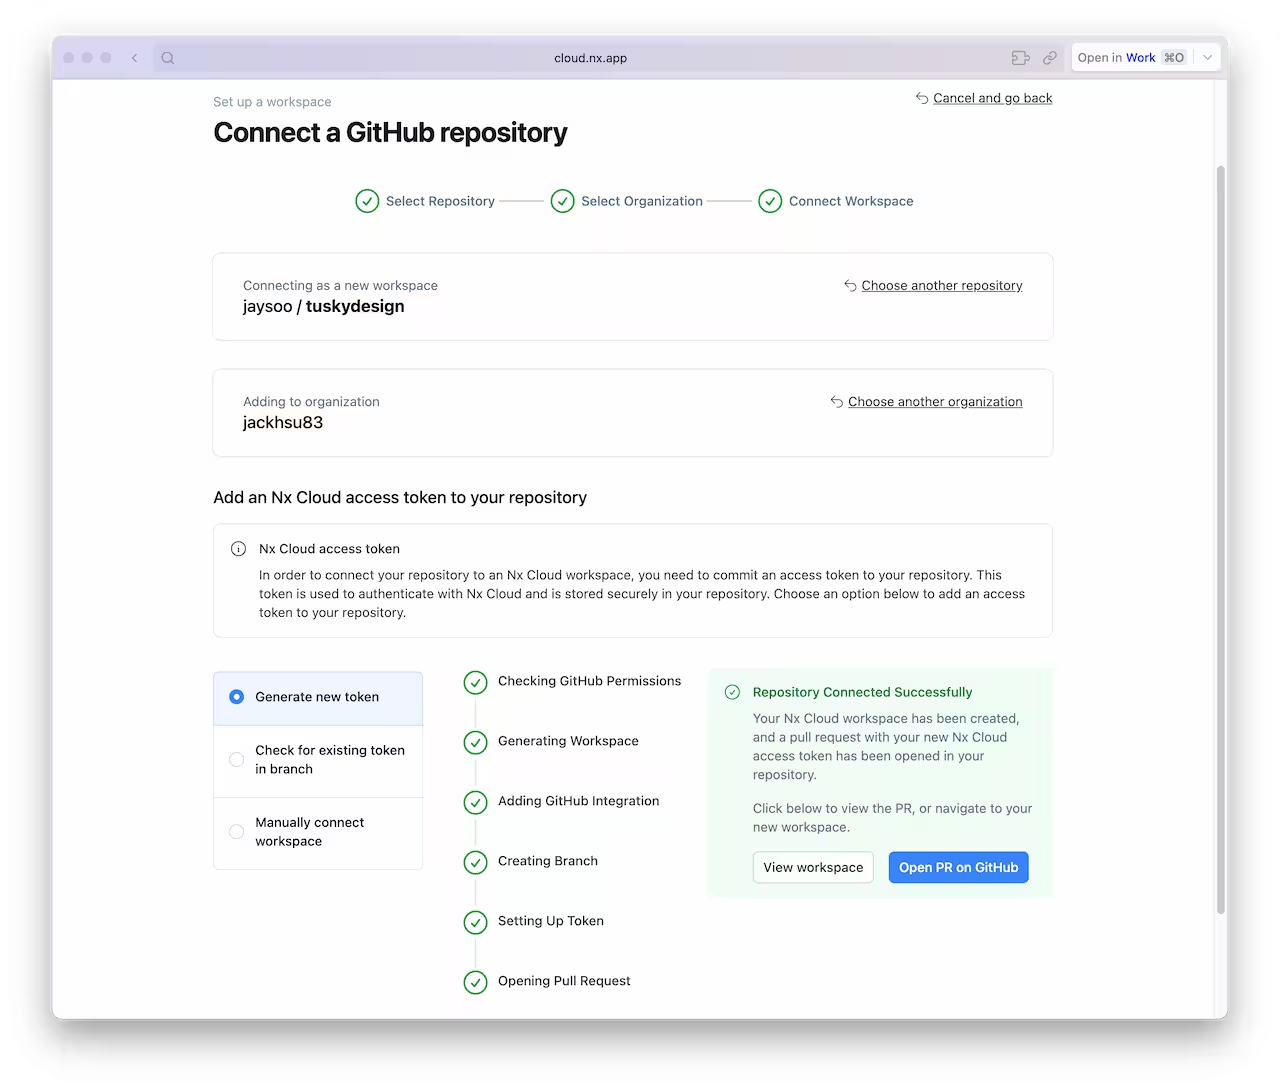
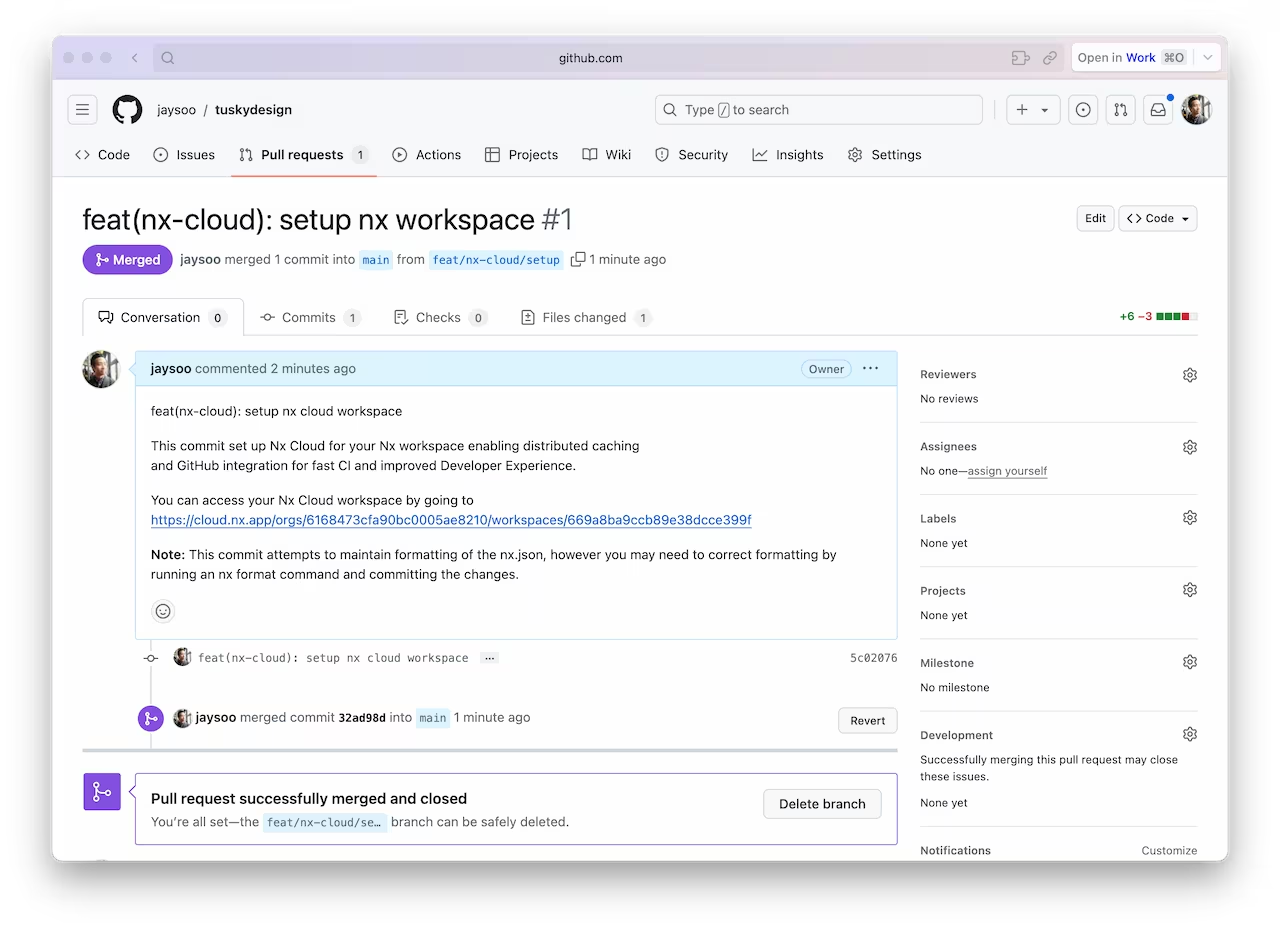
A browser window will open to register your repository in your Nx Cloud account. The link is also printed to the terminal if the windows does not open, or you closed it before finishing the steps. The app will guide you to create a PR to enable Nx Cloud on your repository.

Once the PR is created, merge it into your main branch.

And make sure you pull the latest changes locally:
❯
git pull
You should now have an nxCloudId property specified in the nx.json file.
Create a CI Workflow
Use the following command to generate a CI workflow file.
❯
npx nx generate ci-workflow --ci=github
This generator creates a .github/workflows/ci.yml file that contains a CI pipeline that will run the lint, test, build and e2e tasks for projects that are affected by any given PR. If you would like to also distribute tasks across multiple machines to ensure fast and reliable CI runs, uncomment the nx-cloud start-ci-run line and have the nx affected line run the e2e-ci task instead of e2e.
The key lines in the CI pipeline are:
1name: CI
2# ...
3jobs:
4  main:
5    runs-on: ubuntu-latest
6    steps:
7      - uses: actions/checkout@v4
8        with:
9          fetch-depth: 0
10      # This enables task distribution via Nx Cloud
11      # Run this command as early as possible, before dependencies are installed
12      # Learn more at https://nx.dev/ci/reference/nx-cloud-cli#npx-nxcloud-startcirun
13      # Uncomment this line to enable task distribution
14      # - run: npx nx-cloud start-ci-run --distribute-on="3 linux-medium-js" --stop-agents-after="e2e-ci"
15      - uses: actions/setup-node@v3
16        with:
17          node-version: 20
18          cache: 'npm'
19      - run: npm ci --legacy-peer-deps
20      - uses: nrwl/nx-set-shas@v4
21      # Nx Affected runs only tasks affected by the changes in this PR/commit. Learn more: https://nx.dev/ci/features/affected
22      # When you enable task distribution, run the e2e-ci task instead of e2e
23      - run: npx nx affected -t lint test build e2e
24
Open a Pull Request
Commit the changes and open a new PR on GitHub.
❯
git add .
❯
git commit -m 'add CI workflow file'
❯
git push origin add-workflow
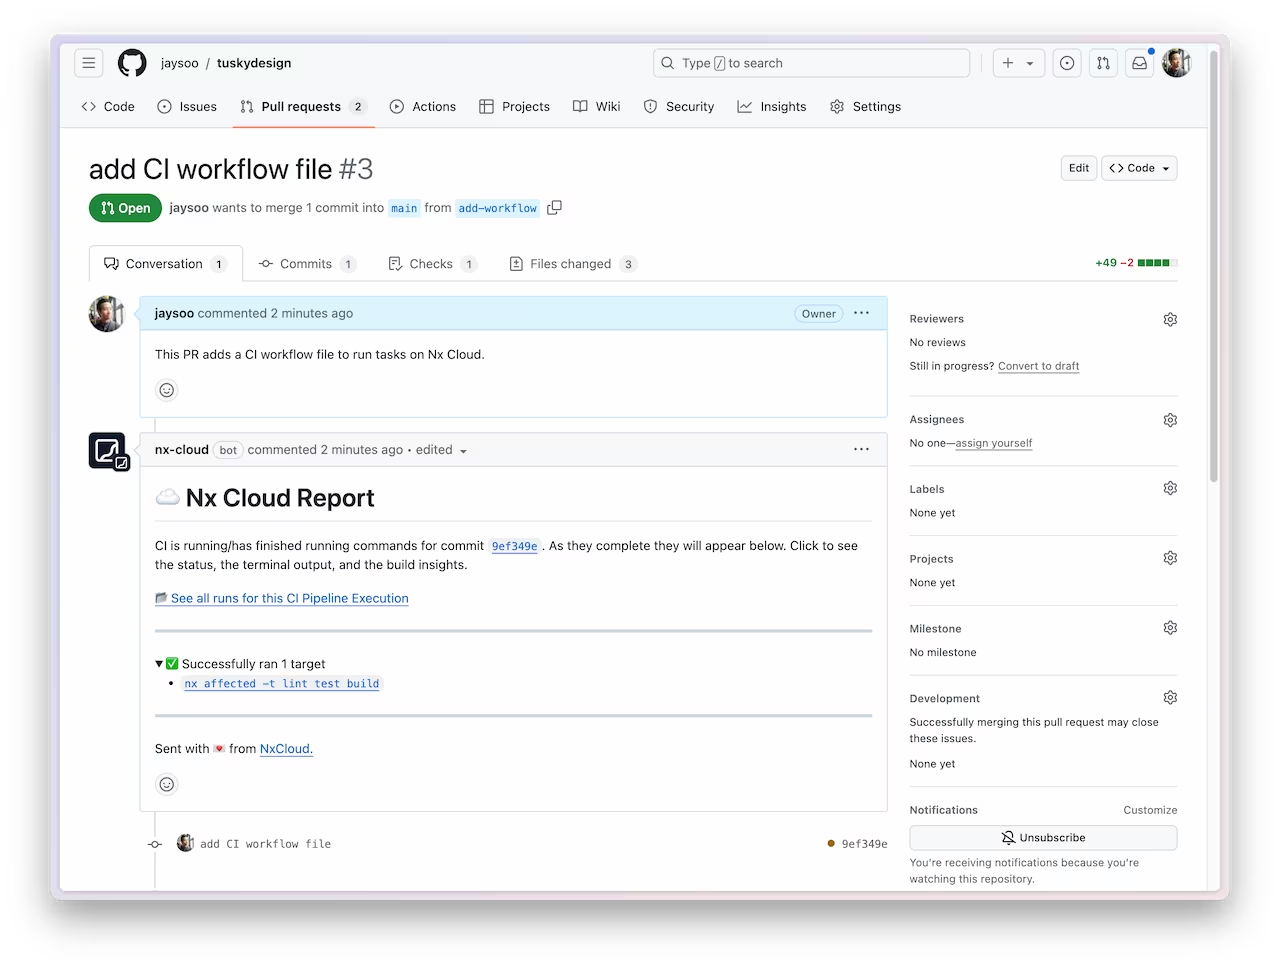
When you view the PR on GitHub, you will see a comment from Nx Cloud that reports on the status of the CI run.

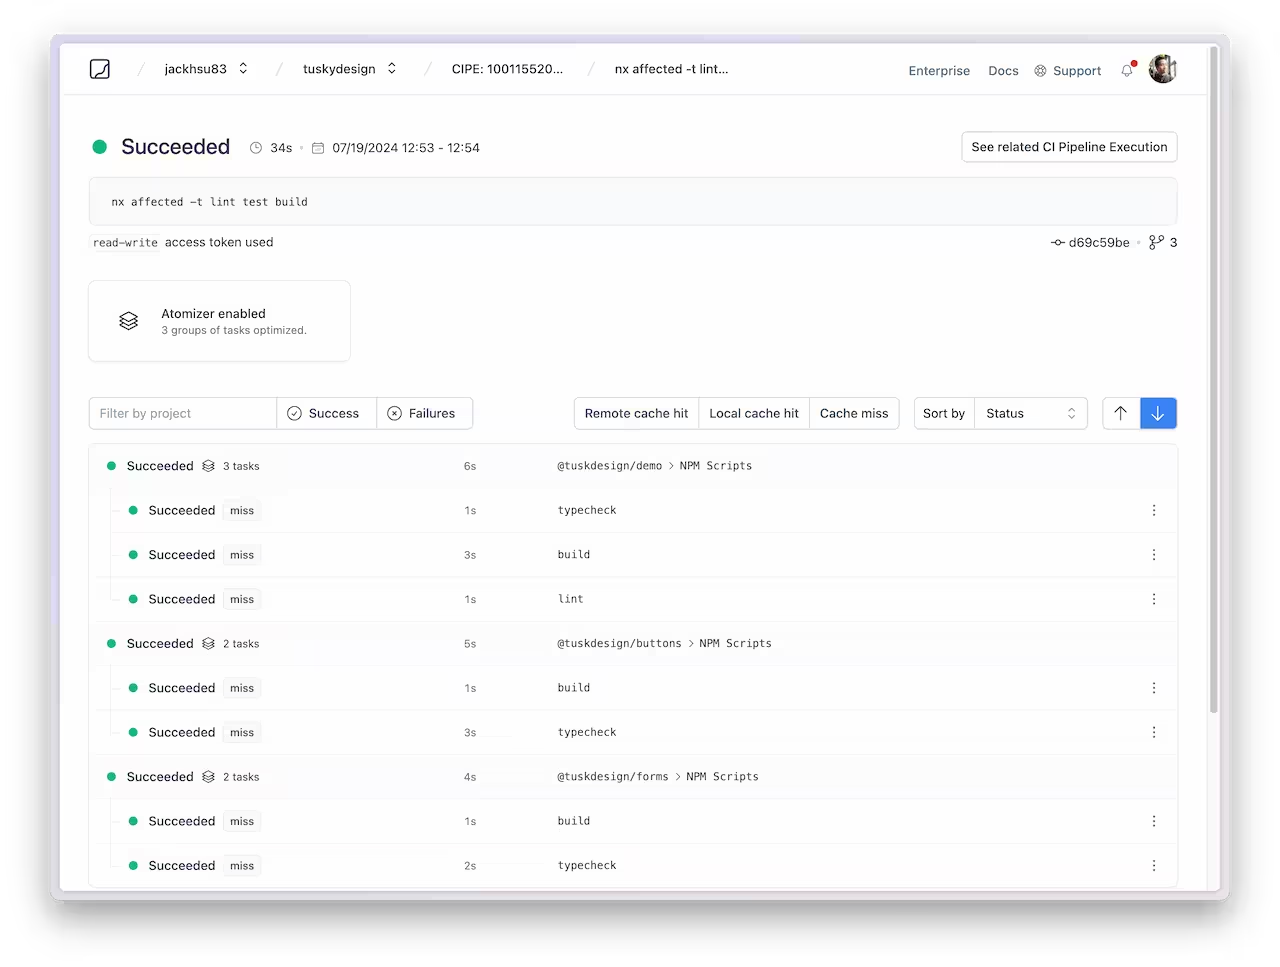
The See all runs link goes to a page with the progress and results of tasks that were run in the CI pipeline.

For more information about how Nx can improve your CI pipeline, check out one of these detailed tutorials:
Next Steps
Connect with the rest of the Nx community with these resources:
- ⭐️ Star us on GitHub to show your support and stay updated on new releases!
- Join the Official Nx Discord Server to ask questions and find out the latest news about Nx.
- Follow Nx on Twitter to stay up to date with Nx news
- Read our Nx blog
- Subscribe to our Youtube channel for demos and Nx insights